
Well, as promised here's the update for the weekend. I got a lot done this weekend, but hit a stop today (Sunday afternoon) when I got to a point where I need a tool to continue.
First, I built this nifty cart to hold my front axle while I am cleaning it and working on it. This was a HUGE help as this thing is heavy!
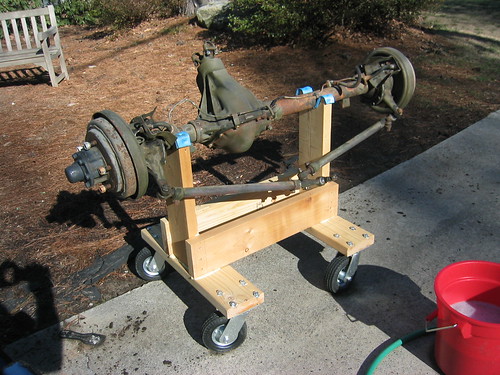

As you can see in the second picture, the steering tie rods and the wheels, hubs, brakes, "knuckles", etc. have been removed from the ends of the axle. This wasn't too bad - I had to use my trusty two and three jaw puller to get some of the stuff off, and the impact wrench helped in a couple of places. My best friend this weekend, however, was a box of 100 latex gloves. Axles have gunk and grease all over them - inside and out.
Things didn't look bad in the ends as I took them apart. Even after the chemical cleaning and water blasting / scrubbing, I didn't see any water in there.
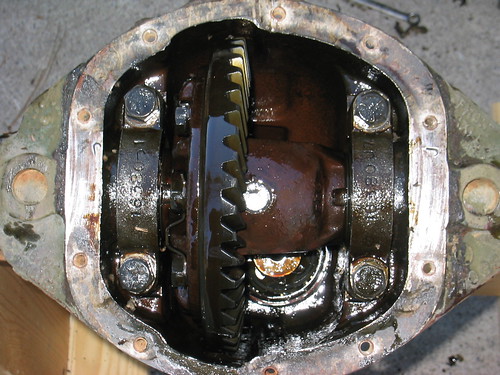
I finally got to working on the center, or differential part of the front axle, and here is where I ran into a problem. I think I am going to need a differential "spreader" tool to get the innards of this thing out. The differential bearings have a pre-load on them, which means that distance between the seats outboard of the bearings is somewhere 0.008 and 0.015 inches smaller than the distance to the outside of the bearings. This puts a "pre-load" on the differential carrier assembly.
Anyhow, things look pretty good in there, too. We'll see how things measure as far as side-play, end-play, and ring and pinion contact/mesh as I get farther into it.
I need one of these:

So, that's where I'm at as far as the axle. I am going to need a spreader (or someone to tell me how to get by without one) to continue. I may use this as an opportunity to try out my welding skills and build one of these. I want to finish dis-assembling the axle to be able to either get it sandblasted or hot-tanked to clean it and the re-build it. Hopefully the center (differential) will only need seals. I am going to replace the bearings, seals, and all of the brake components on the ends.
I am going to need some other tools to complete the rebuild of this thing - a dial indicator and a torque wrench or two. Don't you hate it when you have to buy tools? ;-) I am going to enjoy doing the research to find a good deal.
On the frame re-build, I have progress in the virtual sense. I have a friend of a friend hopefully lined up to do some sandblasting so I can get this thing painted. I think I am going to build a rotisserie to mount the frame on (and eventually the body tub) to make it easy to rotate and also move around in my garage and driveway. My intention is to get the frame sandblasted and then paint with POR15 paint ... http://www.por15.com/ ... and then prime and paint with the Marine Corps Forest Green semi-gloss. Hopefully, I can get that done in the next month or so.


I would NOT take the ring gear out. You are asking for more trouble than you want to get into. Trust me, if turns well and the gear wear pattern is correct then don't touch it. Take the front yoke off and replace the pinion seal and axle seals. How many miles is on this thing anyway? cooter.
ReplyDeleteI have no idea how many miles are on it. The speedo cable was broken. I think the inner axle seals were leaking thats why I want to pull the carrier assembly out. I was thinking that if I don't take the carrier assembly apart and put everything back like it was, the contact pattern should still be good. I was going to test it with Titanium Dioxide anyway to check the contact pattern. The manuals I have go into extensive detail regarding measurements and shim placements to ensure the proper tooth contact. Plus, if I have problems, I can just call you - right?
ReplyDeleteThe real answer is no. If you take the carrier out you can bet you will have to re-shim it. This is not for the faint heart and is a very, very tough thing to do. In fact I've only done it twice and if memory serves me right I used a bluing paste/dye. Can you replace the inner seal if you pull the axle? If not then you don't have a choice, but I've not worked on an axle that had an inner and outer seal. Course that dose not mean a thing:) Was there any sign of metal shavings, grit, etc? Later, Cooter
ReplyDeleteWell, I was wrong about 2 seals. The front (full floater) axle has a seal on the inside, near the diff, and the rear (semi-floater) has a seal in the axle tube out near the wheel. So I don't have to take out the diff carrier in the rear axle. The front, I can't get to the seals without taking the carrier out. So, you think that even if I leave the carrier assmebled and don't mess with anything I'll still have to adjust shims to get the tooth contact right? I am going to test tooth contact with gear marking compound before I take the carrier out and after I put it back in to see. I am not going to take the pinion out at all - just take the yoke off to change that seal.
ReplyDeleteNo, no signs of metal shaving or grit - it all looked pretty clean (in the front ... I haven't opened up the rear axle yet).