Monday, January 19, 2009

Springs

Picked up my springs today from Springs and Suspension.  They have been completely taken apart, cleaned, painted, ad re-assembled. Nice guys and they did a great job.  I’ll post pictures of the springs when I get a chance.

 Uploaded - 1\19\09

On another note, I’ve been looking for a couple of seatbelt clips (they male end of the seatbelt buckle) for my BMW so that I can ride around up at the lake without buckling my seatbelt.  So I found this place PULL-A-PART down on the south side of town near the spring place.  Very cool place.  Here are some pics:

Uploaded - 1\19\09-1 Uploaded - 1\19\09-3 Uploaded - 1\19\09-2

Still waiting on my wheels to be ready.  I’ll get them painted and get the tires mounted and balanced when I get them back.

Frame

I finally took some pics of my frame.  For now it’s sitting outside on my utility trailer since I don’t have anywhere else to keep it.

Jeep frame 1 Jeep frame 2

Between blasting and painting, it looks brand new.  I’m going to pick up my springs this week, so I should have info / pics about that later.

Tuesday, December 30, 2008

Let’s Get back to it!

Wow … has it been over eight months since I last posted?  Well, I have some catching up to do.  Not too much, though – I haven’t done much.  It’s that old pesky job that gets in the way.

Let’s see – what have I gotten done …

  • Frame painted (pics to come) - I got my frame back from being painted (a long time ago) and it looks awesome.  Clancy did a great job.  If you are in the Atlanta area, he’s a great guy to know (see info below)
  • Dropped off wheels to be blasted at a place called Eco-Clean – seems to be a really nice option for any kind of stripping and media blasting
  • Dropped off springs to be re-arched at a place down in the SW part of town called Springs and Suspension, Inc. – there is some question about the exact measurements I need to give to them to finish the job.  I also need to get some paint to them.

So, I don’t have any pictures to post tonight, but I’ll take some tomorrow and as I pick up those parts. And try to make some progress in finishing my front axle.

Tuesday, April 22, 2008

Sorry - been busy!

Well, it has been a while since my last post. The update? No progress. Besides being incredibly busy at work and several out of town trips, I've been sick and had some issues with one of the dogs (inoperable brain tumor - prognosis not good). Hopefully I will be able to get back to work on the Jeep soon and give an update then.

Saturday, March 22, 2008

Installing Pinion Bearing Cups

Well, I've accomplished a lot in the past couple of days.  I totally cleaned and re-organized the garage to give me a better place to work, and, in addition to cleaning up a lot of little odds and ends hardware, I installed two new bearing cups for the inner and outer pinion bearings into my front axle.

First, I am still amazed at how the chemical process works on cleaning this stuff up.  See a previous post on this.  This stuff - I call it "soaking" works awesome and leaves the metal with a really nice finish that does not rust and takes paint great.  I am also going to try powder coating some of these small parts when I can get the right color (more on that in a future post).

Here are some shots of the bearing cup installation ...

Inner cup and shim stack - my previous shims measured a total of 0.031, so I am going back with new shims that total that exact amount.  When I get everything installed, I'll test pre-load and gear tooth contact pattern:

Inner Pinion Cup and Shims


Clean bore - ready for some cups to be installed:

Bore - ready for new Cup


Some tools I'm using ... 3/4 inch threaded rod is used to gently pull cups into place:

Some Tools


Cup installed - inner:

Inner - Done


Cup installed - outer:

Outer - Done


Pinion and Outer Bearing (with pre-load shims) - ready to go in ... (I'm waiting on my yoke to "soak" and get painted or maybe powder coated):

Pinion Shims Bearing


By the way - HAPPY EASTER!


So, I will not be working tomorrow, going out of town next week, and up to SC to visit my mom and dad next weekend, so it will be a while before I put up another post, unless I get restless and try my hand at using my new powder coating set up ;-)

Tuesday, March 18, 2008

Frame is Blasted!

What a title to a post, huh?  Picked the frame up today and then dropped it right off at the body shop.  It looks really good - very silvery with a rough texture to it - after being blasted with Black Diamond 30/60 grit abrasive (Joe picked this up for me from David at Abrasives and Equipment of Atlanta).  Joe said it took him about an hour and a half to blast the frame.

So it's at the Marietta Dodge Collision Center, which is run by my buddy John "Clancy" Nicholson, getting coated inside the rails, primed, and then painted with Gillespie 24052 Marine Corps Forest Green Semi-gloss.  The pics below were taken with my phone, so they aren't that great, but you can at least see the color of the raw blasted metal.

IMAG0029  IMAG0030

Monday, March 17, 2008

Frame Blasting

One of the best un-intended benefits I've found with this project is meeting really nice people.  Take tonight for instance.  I found the Culver Brothers from a Google search, and called Joe Culver about blasting my frame for me so I can get it painted.  I just stopped by this evening to drop my frame off at Joe's place, and not only is he a really nice guy, he's big into building and racing a drag car.  He gave me the quick tour and his car is incredible.  Check out his web site.

Anyways, Joe does blasting - both outside for larger stuff and in-cabinet for smaller stuff, although his cabinet is a big one ... 8ft long.  I pick up my frame tomorrow and then take it directly over to the body shop my friend owns to get it primed and painted.  The frame should be done by the end of the week.

No, I have not yet gotten to the axle.  The War Dept. had me doing some spring cleaning activities around the house this past weekend, so I didn't get to it.  Soon, I promise myself.  I have all of the parts (I think) to get started, got my shipment from John at Midwest Military.

On a totally different topic, I am seriously investigating doing some of my own powder coating.  If I can find the right color of powder, I think I will try it on some of the smaller parts.  It seems to be pretty easy, cheap, and very durable.  More on this later.

Tuesday, March 11, 2008

Knuckle Upgrade and Frame Fixing Thoughts

After reading (and re-reading many times) Ludel's book, I decided to upgrade the screws where the spindle bolts to the knuckle on the front axle.  People do this upgrade because the front wheels ride on these spindles that are then attached to the cast iron knuckles by the threads of six rather small screws (the screws go into tapped/threaded holes in the cast iron knuckle).  While the relatively small wheels and low horsepower of my stock Jeep will probably not cause a problem (this upgrade is usually done for those that are using these axles with oversize tires) I figured while I had everything apart, I might as well do it.

I called MIT Drivetrain and bought twelve of their Grade 8 button head crews with nuts and lock washers.  These are screwed in from the inside of the knuckle so that a screw head is holding the screw in the knuckle casting instead of just the threads the way it was stock (See pictures below).  I had to grind a little off of the head of the screws and the very carefully grind very small flats inside of the knuckle for the screw to seat on. 

Stock: Screw AA (with lock washer) is inserted through hole in spindle BB and screwed into knuckle casting X:

KnuckleUpgr-stock 

Upgrade: Grade 8 buttonhead screws are screwed into knuckle casting from the inside ... spindle will be placed over screws and secured with Grade 8 nuts and lock washers:

IMG_4731  IMG_4732

IMG_4734  IMG_4735 


I also think I may have found a guy to straighten my frame.  There is a place down the street that restores vintage cars (Back in Time Automotive - Ken Wallace), so I stopped in this morning to ask if they knew of anyone.  At first the guy said no, but after scratching his head for a while, he called a buddy that is "semi-retired" who may be able to help me out.  We'll see.  They also gave me the name of a place that does sand/media blasting, so that makes three places - one up North of town called Procryo who will blast the frame and powder-coat it for $575, a place over West of me that will blast anything I bring them for $60 per hour, and this new place that I haven't called yet.  I am anxious to get this frame DONE!

Finally, I want to put in a plug for John at Midwest Military - he is the man for M-series parts and advice.  I highly recommend him ... if you are restoring an M-series vehicle, you should have his phone number and e-mail address starred in your address book.  He is sending the parts I need to finish this axle up and move on!

Friday, March 7, 2008

Steering Knuckle Cleanup

While waiting on some other parts to come in (more on that this weekend), I decided to go ahead and clean up the steering knuckles. I don't know if you can tell from the pictures or not, but they were somewhat caked and greasy. I've been wanting for some time to try some low-effort chemical stripping, so after some research, I headed over to The Home Depot to pick up some drain cleaner and some etcher/rust remover. It is amazing what you can find out by using google and looking at the MSDS information for some of these chemicals. All I can say is that I am pretty pleased with the results. No scrubbing or brushing, just letting things soak.

Knuckles Before:

IMG_4720

Home Depot Chemicals - the 10 min drain cleaner is mainly Sodium Hydroxide, commonly known as Lye, and the etcher is primarily phosphoric acid:

IMG_4724IMG_4723

NOTE: FOR SAFETY REASONS YOU, AS I DO, MUST WEAR PROPER PROTECTIVE EQUIPMENT WHEN DEALING WITH CHEMICALS THIS DANGEROUS, AND THEY ARE DANGEROUS. SAFETY GLASSES AND HEAVY DUTY CHEMICAL RESISTANT GLOVES (NOT LATEX EXAM GLOVES) ARE A MUST. THIS STUFF MUST BE KEPT OUT OF REACH OF CHILDREN AND ANIMALS.

I purchased two five gallon buckets with lids (you do not want anyone messing with this stuff) for my tanks and put about four gallons of water in the first "caustic" tank. I then sprinkled in about 1/2 of a can of the drain cleaner. I let the knuckles soak over night in that. This afternoon, I put about two gallons of water in the "acid" bucket and added the two gallons of etcher. After about 20 hours in the caustic, I got impatient and took the knuckles out and rinsed them off. I put them in the acid for about two hours, and took them out - here's a pic of that:

IMG_4721

I then put them back in for another two hours, and basically, they look brand new. No fuss - really, no effort other than the initial set up.

IMG_4725

Here is the transmission cross member - I stuck half of it in the caustic for four hours and then in the acid for four hours. It had already been pretty well degreased, but still had some crud and rust on it. Before the treatment it looked pretty much consistent - look at it now (bottom is obviously the treated part).

IMG_4728

So, what do you think? It's a lot easier than scrubbing and wire brushing, and seeing as how I do not have a sand blasting set up, it looks to be a good option for things that will fit in the buckets! I want to get some sort of mesh container that will fit in the buckets that I can put small parts in.

I am going to work on putting the axle back together this weekend - various tasks. I'll report on that Sunday or Monday. ciao.

NOTE: FOR SAFETY REASONS YOU, AS I DO, MUST WEAR PROPER PROTECTIVE EQUIPMENT WHEN DEALING WITH CHEMICALS THIS DANGEROUS, AND THEY ARE DANGEROUS. SAFETY GLASSES AND HEAVY DUTY CHEMICAL RESISTANT GLOVES (NOT LATEX EXAM GLOVES) ARE A MUST. THIS STUFF MUST BE KEPT OUT OF REACH OF CHILDREN AND ANIMALS.

Sunday, March 2, 2008

Initial Paint on Front Axle

I made a fair amount of money on my eBay auctions, so I hope to have enough funding for a while.

While it sure doesn't feel like I got a lot done this weekend, I put in some hours.  I have the seals and gasket I need to put the diff back together, but I am waiting on my new torque wrench to arrive.  So I cleaned and painted this weekend.  Hopefully next weekend, I can start re-assembly.  I am going to have to make a tool to hold the yoke while torqueing the pinion nut to 225 lb-ft.  That will be fun.

So here are some pics of the paint job. I just love that USMC Forest Green ...

IMG_1671  IMG_1670

Sunday, February 24, 2008

Not much progress ... In fact NO progress ...

Well, I didn't get much done this weekend other than dreaming.  I had to get some work done (yes, income producing job related work - that kind), some work around the house, work on the Cub Scout Pinewood Derby car, a party Saturday night, paying bills, doing expense report, etc.  Oh, and I am shutting down one hobby to finance another.  My large format photography equipment and some other miscellaneous stuff is going up on e-bay to pay for the jeep.  If you are interested, here is a link to the stuff I am selling: E-bay Items

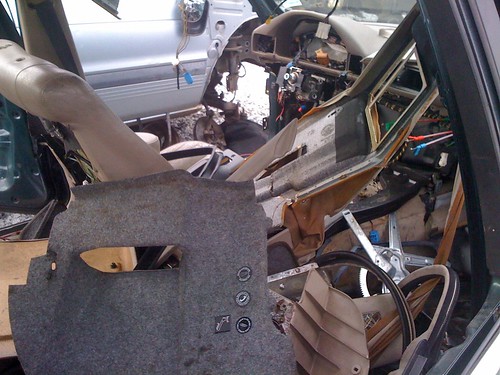
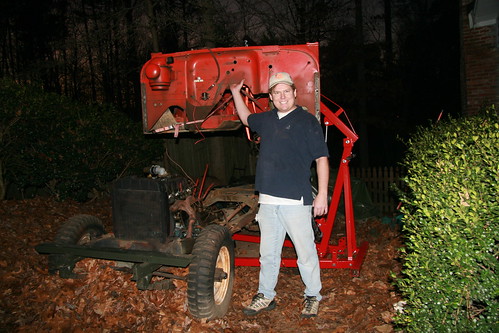
So, I am still thinking about what I need to do next ...

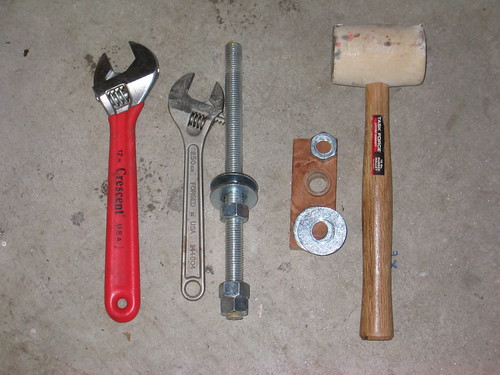
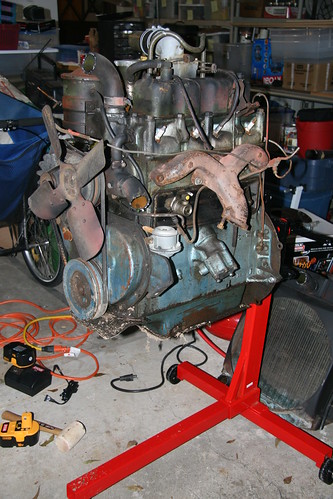
At least with some e-bay funds that are "off the books" so to speak, I can get some of the tools and parts I need.

I did find an interesting summary write-up you might enjoy ...

M38A1 and M170


Enter The Biscuit Fender
In 1952, Willys introduced a wildly different looking jeep than anything else they had sold to the military or their civilian customers, the M38A1 (or MD, as it was known internally). The flat fenders of the M38 were to be seen in non-combat roles from now on, as the faster, more powerful –A1 model became the weapon of choice. Interestingly, the suffix -A1, -A2, or so on, usually denotes a minor revision to an already existing model. The M38 (and its civilian counterpart, the CJ-3A) looks vaguely like the M38A1, and there the similarity ends. The body was different, most notably in its rounder fenders, the engine was the new Hurricane overhead valve four-cylinder, and the Spicer axles were heavier duty model 25s in the front and 44s in the rear. The later civilian version of the –A1 is the CJ-5, but the military bought a tougher version with a stronger frame, reversed shackles, and a 24-volt electrical system. An ambulance version, the M170, is the basis for the CJ-6 and was capable of carrying three stretcher patients or six seated troops.

Over its entire production run, the M38A1 was produced by only a handful of manufacturers. Most people can name Willys-Overland and/or Kaiser-Willys, but did you know that Ford produced some? Also, in 1955, the Dutch army received the first of its NEKAF jeeps. These M38A1s were assembled by Nederlandse Kaiser-Frazer (NEKAF) and were used for over 40 years by the royal army. (From 1958 to 1962, another company took over from NEKAF but since they acquired the rights to use the name, we’re not going into that here.)

What To Look For
The M38A1 (and CJ-5) have to be the easiest jeeps to identify in the M- and CJ- series. The changes that make the M38A1 unique are the styling cues of the old M38/CJ-3A, combined with the new engine, the new body tub, and hood. The traditional jeep grill with its round headlights framing vertical slots was still there. Clearing the overhead valve engine was simplified with the new higher and rounder hood. Carrying more equipment or troops was easier with the upgraded suspension. Telling one apart from the later CJ-7 is so easy that experienced jeepers may find it insulting to list the major differences here, but for the new folks (and we all were new at one time) take a look at the door opening. If it’s got the “rump hump” just like its older counterparts, then it’s the M38A1 or CJ-5. If it’s got the door opening that is almost square at the bottom like a YJ or TJ, then it’s a CJ-7. At least you can get into or out of the later models without hitting your butt on that darned hump! As always, look for brass data plates on the dash identifying the vehicle as military. They will also list top speed for the vehicle in every gear and describe exactly how to use the four-wheel drive. Civilian models have an aluminum plate that usually says Jeep or Willys with a background of farm and industrial buildings, giving the prospective purchaser a good idea at who the jeep was aimed.


A cool version of the –A1 was the M38A1C, which had a two-piece windshield with a vacant slot right in front of the passenger. That is, if a passenger had been able to ride on that side. The –A1C was meant to carry a 105mm or 106mm recoilless rifle which was mounted in the back, but when in transit, the barrel of the big gun was pointed forward and a normal windshield would have been in the way. The spooky version of the –A1 was the M38A1D which was the model meant to carry the “Davy Crockett” tactical nuclear missile launcher. Luckily somebody wised up and withdrew this version, since I’m not sure that letting field grade commanders have access to theater scale nukes was a good idea.
The M170 ambulance version of the M38A1 is even easier to spot. Its longer wheelbase (101” Vs 81”) differentiates it from the shorter combat jeep, and its crazy door opening insures that you’ll never mistake it for the CJ-8 Scrambler. It was built from 1954 to 1962 or 1964, depending on what source you go by.


Best Military Jeep?
Old motorpool mechanics will tell you that the M38A1 was the best jeep they ever had in the inventory. The M38 before it was too slow and the M151 after it was too complicated. This war-horse was tough and easy to maintain. It was so popular, that even as the M151 was being ordered for combat duty in Vietnam, the M38A1 was still being bought by the Marine Corps which was unimpressed with the MUTT. The M38A1 was produced well into the sixties and became the last in the long line of simply maintained and easily recognizable jeeps that the military would use. Versions of the M38A1 were produced all the way until 1971, its longevity attesting to its durability and usefulness.


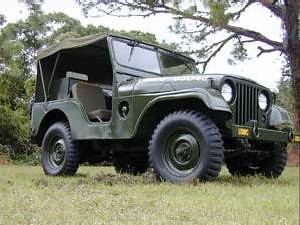
In the mean-time, I keep dreaming ... I want my jeep to look like this, I want my jeep to look like this, I want my jeep to look like this:

    USMC-M38A1

Friday, February 22, 2008

Gathering Various Info - Machine Shop ...

I've been asking a lot of questions on a lot of Jeep and MV (that's Military Vehicle) boards to try to learn as I go along.  One of the things I've found is a recommended Machine Shop.  Here's a quote:

"The machine shop I was referred to is "Will's Automotive Machine Shop" in Chamblee just off Chamblee-Dunwoody Road and Buford Highway.

They have been in business for 30+ years and it is a father / son business. Not only did they do an outstanding job on my cylinder head, they bead blasted my intake and exhaust manifolds and also turned around my valve cover and oil pan in no time.  They have been extremely honest and reliable and have been very helpful in assessing the condition of my engine.

I was hoping to only have to recondition the top half of my engine, but after guiding me through pulling a rod bearing, pistion and a main bearing for their inspection, they took the time to inspect everything share the details of my original - untouched 258.  Had I not had a broken second ring, I might have gotten away with not doing anything but new rings and bearings. But, do to the second ridge on the cylinder wall and the fact that I plan on keeping the Jeep for years to come, I am going ahead having them go through it ... bore it, match new pistons and rings, bearings, etc. 

They have been very reasonable and great to deal with.  Plus, the Dad (Will) is the original owner of a 1973 CJ5 with only 32K original miles that is still running strong! It doesn't hurt that they are Jeep lovers too!"

Here's the contact info ...

Will's Auto Machine Shop Inc

3149 Chamblee Dunwoody Rd Atlanta, Georgia 30341

Phone: (770) 451-4081

It's always good to pass along good places like this!

On another note, some of my parts came in, so I should be able to be busy this weekend!

Monday, February 18, 2008

More work on the Front Axle

I spent what little time this weekend I had to work on the project scrubbing, cleaning, and inspecting the front axle.  I was able to get the diff carrier out without a diff spreader by putting a wrench on one of the ring gear bolts and turning the input yoke until the diff carrier "rolled" itself out.  I have some steel that I am going to use to build a diff spreader if I need it, and also a rotisserie (mainly for the tub, when I get to it, but it may be handy for the frame too).  I have some gear marking compound, gaskets, and seals on order, and the bearings all look OK.  Where I have wire brushed the outside, I am keeping it covered with WD-40 to keep it from rusting.

I did have some questions that I posted to some Internet boards -- we'll see what answers I get back, if any ...

  1. I have cleaned the outside and wire-brushed a lot of it, but I have a transmission shop down the street that I think will hot tank it for me to get in all of the nooks and crannies. Will hot tanking hurt the knuckle and pinion cups? Is there a better way to strip the outside in prep for paint? I want to avoid getting grit inside the housing as much as possible. 
  2. What is the preferred sealant (Permatex 300?) on:
      - the outside rim of the oil seals
      - the pinion yoke butt and splines
      - the fill/drain plugs
      - the bolts that go through housing through-holes (like the carrier bearing cap bolts)
  3. What is the preferred sealant on the housing gasket?
  4. What is the preferred gear oil? Is 85W-90 better than regular 90wt.?
  5. I banged the pinion out with a block of wood per the manual - does this damage the outer pinion bearing or bearing cup? It looks and feels OK.
  6. What is the preferred grease for the wheel bearings, axle joints, and knuckle? Ludel recommends Texaco Starplex-2 but I can't find it locally.
  7. Is the paper gasket behind the pinion seal necessary?
  8. How much pitting is OK on the knuckle external surfaces? What is the preferred way to fill pits - is JB weld or epoxy OK?
  9. Can I take a couple of extra drive plates to a machine shop and have them machine out the splines so that all of the front axle internals aren't spinning - i.e. maintain the correct look (no lock-out hubs) but reduce front axle wear. Will that work? Drive plates are easy to swap when I want 4wd.
  10. Is the diff cover vent fitting re-buildable or should I just buy a new one?

I am sure I will have more questions later!  Especially about this sealant stuff -- Permatex 300, RTV (different colors), form-a-gasket, hi-tack, etc. - I am not sure about the usage of all of these yet and what situation is best for each.  More fun research!

As far as the frame, a buddy gave me the name of a guy to do sandblasting, but I haven't tracked him down yet.  I also found another place that will blast and powder-coat my frame for $575, so I may go that direction and then put primer and USMC paint over that.

I lucked out and was pointed to an original Army manual for the 24V electrical components for cheap on e-bay, so that should be arriving soon.

Next weekend, I hope to paint the axle, and re-assemble the center/diff part ... my lovely wife gave me a dial indicator for Valentine's day (how romantic!), so that will be very helpful putting the diff back together!  I'll give an update and hopefully some photos then.

Front Axle - Exploded View Diagram:

Dana25Diff-Exploded

After that, I'll work on the "ends" of the axle - the knuckles, brakes, wheel spindles/bearings, and then the springs and steering.  I'll probably get two wheels cleaned and painted and two new tires put on for the front axle so when I move it off of my little cart to make room for the rear axle it will have something to sit on outside (no room at the inn for two axles at a time!).

Monday, February 11, 2008

Cool Tools

OK - I am at the point where I need to contemplate some tools.  Not just the diff spreader (see below), but things like Torque Wrenches, Dial Indicators, Micrometers, Calipers and the like.  I really would like to have a big compressor (like this one or this one) so I can do sand blasting and use air tools, but until I can save up ... well, you know.  My lovely wife bought me this Craftsman set for fathers day, and I already had several sets of screwdrivers, Channel-loks, Vise-Grips, etc.

I've needed a Torque Wrench for a while, but I have to have one to work on this axle (and transmission/transfer-case, and engine).  Here's the one I am currently considering: Torque Wrench

As far as measuring tools, you can spend a lot, or you can spend a little (and get junk).  I am hoping to find something in between.  Here's what I am looking at for these types of tools:

Finally, on a sort of related note, if you are into vintage automobiles, you need to get this book.  It is available in different years and for less than $20.  Audels New Automobile Guide - it is a very comprehensive general guide on automotive mechanics, including the theory behind how everything works.

Sunday, February 10, 2008

More on frame and axle work - WEEKEND UPDATE!

Well, as promised here's the update for the weekend.  I got a lot done this weekend,  but hit a stop today (Sunday afternoon) when I got to a point where I need a tool to continue.

First, I built this nifty cart to hold my front axle while I am cleaning it and working on it.  This was a HUGE help as this thing is heavy!


As you can see in the second picture, the steering tie rods and the wheels, hubs, brakes, "knuckles", etc. have been removed from the ends of the axle.  This wasn't too bad - I had to use my trusty two and three jaw puller to get some of the stuff off, and the impact wrench helped in a couple of places.  My best friend this weekend, however,  was a box of 100 latex gloves.  Axles have gunk and grease all over them - inside and out.

Things didn't look bad in the ends as I took them apart.  Even after the chemical cleaning and water blasting / scrubbing, I didn't see any water in there.

I finally got to working on the center, or differential part of the front axle, and here is where I ran into a problem.  I think I am going to need a differential "spreader" tool to get the innards of this thing out.  The differential bearings have a pre-load on them, which means that distance between the seats outboard of the bearings is somewhere 0.008 and 0.015 inches smaller than the distance to the outside of the bearings.  This puts a "pre-load" on the differential carrier assembly.

Anyhow, things look pretty good in there, too.  We'll see how things measure as far as side-play, end-play, and ring and pinion contact/mesh as I get farther into it.


I need one of these:


So, that's where I'm at as far as the axle.  I am going to need a spreader (or someone to tell me how to get by without one) to continue.  I may use this as an opportunity to try out my welding skills and build one of these.  I want to finish dis-assembling the axle to be able to either get it sandblasted or hot-tanked to clean it and the re-build it.  Hopefully the center (differential) will only need seals.  I am going to replace the bearings, seals, and all of the brake components on the ends.

I am going to need some other tools to complete the rebuild of this thing - a dial indicator and a torque wrench or two.  Don't you hate it when you have to buy tools?  ;-)  I am going to enjoy doing the research to find a good deal.

On the frame re-build, I have progress in the virtual sense.  I have a friend of a friend hopefully lined up to do some sandblasting so I can get this thing painted.  I think I am going to build a rotisserie to mount the frame on (and eventually the body tub) to make it easy to rotate and also move around in my garage and driveway.  My intention is to get the frame sandblasted and then paint with POR15 paint ... http://www.por15.com/ ... and then prime and paint with the Marine Corps Forest Green semi-gloss.  Hopefully, I can get that done in the next month or so.

Monday, February 4, 2008

Update on Frame and Axles

Yes, I've been working on it - just haven't had time for posts.

I am rebuilding this bad-boy from the frame up. Frame first, then axles, suspension, steering, brakes, transfer, transmission, engine, driveshafts, probably in that order. Of course things change .... but we'll see how it goes. I can't think beyond the frame and axles right now.

I've really been working on cleaning the frame and transmission cross member/skid plate. After playing with a few options, Easy Off Max Professional oven cleaner seems to be my friend in cleaning off "gunk" - oil/mud/slime/etc. - just spray it on, wait a few hours, and then scrub with a brush and hot water, rinse with a hose. I then spent some time with my trusty 4 1/2 inch grinder with a wire cup mounted on it to clean off paint and rust. It's all pretty clean now. I am waiting on a friend to figure out the best place to either have the frame blasted or dipped to complete the clean up.

I have measured it, to the best of my ability utilizing 3D laser level and a plumb bob, and it looks pretty square (within 3/8 inch) and has about a 7/8 inch twist in it. I think someone hit the right side of the back panel, which "jerked" that corner of the frame up a bit. When I get to the body tub, I expect a twist in it, too. I plan on getting this thing on a real frame rack when I get the running gear installed.

While the frame is resting waiting on the next step, my thoughts are turning to the axles. I've re-read all of the manuals (see previous post), and am feeling more confident in taking these on (the axle re-build is more complicated than the engine or powertrain due to the tolerances and set up needed to maintain proper clearances and pre-loads). So, I removed the springs and shocks from the front axle (impact wrench was definitely my friend here!) in preparation to moving it into the garage. I'm going to build a small wooden fixture with casters to hold the axle and allow me to easily move it - this thing is heavy!

I have to go out of town this week, so it will be a few days before I can work on it again. More updates and pictures this weekend, hopefully.

Saturday, January 19, 2008

Frame Re-building

Well, there's not much to a frame, but I don't want to have to take this Jeep apart again, so I am trying to figure out the best way to strip all of the old paint and rust off of it, and also get it straightened. I think I mentioned previously that the frame had a 1 or 2" twist in it. It looks like it got the twist when the Jeep was either rear-ended, or someone backed into something, denting the tub and raising the right rear corner. It's not bad, and shouldn't be a big deal to fix (you wouldn't know it unless you looked close).

There has been a decent discussion on stripping rust and paint over on the Willys M Jeeps site:
http://www.willysmjeeps.com/v2/modules.php?name=Forums&file=viewtopic&t=1995

I have a friend who is planning to help me out with either the chemical route or the media blasting. I'll keep y'all up to date. In the meantime, have fun in the snow!

Friday, January 18, 2008

Dis-assembly and Strip Down to Bare Frame

Here's what I've got so far ... after stripping off all of the brackets, plates, seats, fuel tank, etc., I then began removing the major body pieces. I removed the windshield, hood, front fenders and grill, and then REALLY started tearing this Jeep apart.

REMEMBER - This all happened after I had studied every Jeep manual and web-site I could get my hands on for months. All small parts went into zip-top freezer bags of various sizes labeled with a Sharpie. Also, I took a lot of pictures as I went along.


Body Off:

(Pay no attention to the fat guy in that pic.)

Powerplant out:


Nice little 72 hp 134 cu. in. F-head 4 cyl., on a stand ready for rebuild:


Nice little T-90 transmission, also ready for re-build, and the T-18 transfer case - yep, ready to open up and inspect - I hope it doesn't need a re-build, but we will see:


Also, the axles are out and ready to be opened up and inspected. I hope they don't need much more than seals.

BUT, the next thing to work on is ... the frame (with un-bolted transmission cross member laying on the right) - all stripped down and ready to be cleaned and straightened (it has about a 1-2 in. twist in it, as far as I can tell):

Note: see that little rectangular plate mounted on top of that middle cross member? That's the machine gun pedestal mount - he he.

All looks pretty simple, doesn't it?

Wednesday, January 9, 2008

Information and Parts

While I'm thinking about it, I wanted to point out some of the places where I get information and parts. My main source of information and a great place to ask questions (especially on M38 and M38A1 Jeeps and their variants) is the Willys M Jeeps site. Wes and Ryan, along with the rest of the forum members, are a huge source of information and can answer just about any question you would ever have. There are also some great downloads on this site.

http://www.willysmjeeps.com/

The other main source of information as well as parts is John Bizal at Midwest Military. John has done many restorations and is another wellspring of information as well as very high quality parts at reasonable prices.

http://www.midwestmil.com/

A few other places I visit:

The "G" - http://www.g503.com/
The M38A1 site - http://www.m38a1.com/

And for some re-building information on T-90 transmissions and T-18 transfer cases:
http://www.willystech.com/wt/T90RebuildGuide/T90rebuild.htm
I bought Rick's video - it's great.

As far as a library goes … I have these in both paper and electronic (PDF):
TM 9 – 8014 (Operation and Maintenance)
TM 9 - 8015-1 (Engine and Clutch)
TM 9 - 8015-2 (Powertrain and Body)
ORD 9 SNL G-758 (Full, detailed parts listing)

And these in paper only:
AR 850-5 (Markings)
TB 9 – 2855-43 (Personnel Hot-water Heater Kit Installation)
TM 9 – 2320-208-20P (Repair parts and special tools)
TM 11 – 284 (Radio Sets – AN/GRC series)

I also have all revisions/updates to the above, if there are any. I also have this book: http://www.amazon.com/Jeep-Rebuilders-Manual-1946-1971-Restoration/dp/0837610370/ref=sr_1_14?ie=UTF8&s=books&qid=1196280297&sr=1-14 – pretty good, nay EXCELLENT, book.

I’ve asked for this for Christmas … http://www.vintagevideo.com/jeep/index.html - shows a rebuild of a WWII Jeep, but I hoped to learn something out of it and get motivated.

I can tell you I've read for hours and hours and surfed the 'net for hours more to figure out the best way to do things!

The Beginning ...

I started thinking about how cool it would be to own and drive a military Jeep. They just look cool. A guy I know has one and when I saw it, it really whetted my appetite. So around the end of the year in 2006, I started looking for one (anticipating my bonus to arrive in Jan 2007 ...) and ended up finding quite a few suspects.

One that really struck me was a Jeep that was listed on e-Bay, with a bunch of spare parts. I put in a reasonable bid, expecting to go to bed and find that I had been out-bid when I woke up in the am, but to my suprise, I won!


In late January 2007, I convinced my brother to make the trip up to NC with his HD pickup and trailer to help me get the Jeep back home. When we arrived to pick it up, it was in better shape than I expected, with more/better parts, and to top it off, it was a Marine Corps Jeep - nice!

So here is my place to chronicle my restoration of the 1953 USMC M38A1 military Jeep. I'll try to keep this up to date with my progress and some pictures as I go along.